Showing posts with label giant hand. Show all posts

Monday, September 9, 2013

The giant hand is complete!

Lets all give a big round of applause---  hahahaha. Couldn't resist. Get it? Big round of applause for the giant hand??? Anyone??  Never mind.....
You can't even see the extent of the dirt that I was covered with!


The hand is finally finished- I have the second layer of concrete on, plugged up any holes so it doesn't become a giant hornet's nest, and the water from the snow shouldn't get in there  to thaw and freeze and wreak general havoc.  Here is a post that discusses part of the creation of it.  I really should do a recap for my own reference, but we shall see.  that will involve a lot of searching around.

I also, in case you noticed, managed to totally weed the stone fence garden here, which was out of control weedy.  No pic of that, so you will have to take my word for it.  It looks pretty good!!

So at some point I will be making something to go in/with the hand.  THIS is so cool, as I have been discussing/agonizing/boring/driving my friends and family crazy with the creating of this thing for about 4 years.  whew!  AND YAY now I get to plant some rock garden things around it.....  LOVE my rock garden.
Raw materials- concrete, sand, water, hoe, wheel barrow- and gloves

completed hand ready to cover and cure


Crawling under this this was interesting!  


The next morning, curing is ongoing.


THIS will  give me a lot of joy in years to come

Wednesday, May 30, 2012

Project weekend- a beginning and an end

Projects: we always have a few of them going on!  

I won't even get into the ones that have gone on an embarrassingly long time- ahemcoughcabin- or even ones that I get so much "advice" on that I don't know what to do- that would be the giant hand project.


So here is the end and the beginning of projects from Memorial Day weekend. I like to start with a mission accomplished!  I recently started working on my mom and dad's old patio set.  I really like the look of this set, it is well made and pretty cool, it is just that sitting in the incredible heat of my parent's cement porch, it had degraded.  The strapping had broken down, the paint was peeling, the cushions are kind of disgusting.  But the curves of the frame are cool.  So, I decided to rescue it and refinish.  Last fall I ordered some repair straps from a patio furniture online place, and I picked up some spray paint at a home center. I also picked up some new cushions on sale last fall, but am  not convinced they are right... At any rate, I finally convinced the MA to FIND the freaking metal brush already, so I could start removing the old paint.  I used sand paper for a while, but the metal brushy thing worked better.  Thanks, toots!
BEFORE!

Sanding and sanding

Starting the spray painting

Side by side

Most of the straps applied to first chair

It took several days of sanding, scrubbing, spray-painting, painting some more, retouching the paint, flipping it over and finding more places to paint, and oh yeah, moving the crazy things in and out of the garage about a million times.  Then the "fun" job of putting on the new strapping.  The plastic straps get applied with the use of a drill, boiling water, a minimum of 2 people and the patience of Job.  It was not a difficult maneuver, but it was tricky.  I want it known that since I actually read directions, I was right!  You do not need to know what I was right about, but let's just let that be known!  HA!  After the MA and I survived the replacement of the straps on one chair (actually, the remaining 3 had not been painted) the rest of them were completed with the help of one of the kids- the eldest Mad-son to be exact.  Good thing, too, cuz, seriously, that fake patient voice about makes me want to....       oh never mind.  It's all good!  :)
Jon, Sarah, Fred and of course Ruger

The straps are cut about 2 inches short, then they are boiled and stretched. CRAZY!

With the painting done, the plexi is applied to the table frame. 

HAHAHA, Ruger was exhausted after all that work

BUT, it got done and that is what counts.  Turns out that 3 people work out even better than 2 for putting on that crazy strapping stuff.  Glad Jonny and Sarah were kind enough to pitch in!  And you will notice the wayward dog or two as well!  THAT was a satisfying job well done!


Also, as I noted on Facebook, hell has frozen over and the garden shed that had been a dug out pile of gravel for 2 years is actually underway!  There is actual fill and concrete forms.... shut the front door!  There was a transit involved!!  And there is talk of bringing in a cement truck!!!!  GASP!  Stay tuned for further updates..... now if I could only get some interest in finishing off the actual house!

I always think of my dad when the tractor is running!  

Things always seem to get done quickly when the Builder Joe shows up!

Spreading and shoveling!


Sarah Jane running the transit- it is easier to do than I thought!  

Surveying the job so far 
So the forms are up and it is almost ready for a concrete pour!  My giant hand is almost ready for concrete, too, I should get it ready so I can steal a few buckets for the base.  Well, we now know what my first summer project is going to be!  Along with some closet cleaning, some weeding, um socializing with my dear friends, working out, walking, running.........  Hmmmm, I have to start a list!

This is how far the hand is!  Just gotta add some rebar and finish some wiring
Until next time, don't forget to be a joy-giver!

Tuesday, July 5, 2011

Could you give me a hand with this?

Today is the day I begin installation of my big metal hand.  This is going to be a multiple day process- and hence a multiple post event!

The first order of business here is to dig out some grass/sod.  I need to do that, as I have been told that it will be too hard to get the lawn mower underneath of the hand.....  sooooooo, I dug out the grass.  I will eventually put fine gravel and/or sand on the dirt under there, or the grass will creep in.  It isn't a huge chunk of sod, but it is  big enough- maybe 6 ft. across and 4 ft. wide.  I spent an hour and a half(and a LOT of calories) digging out the sod, transporting it to be "disposed" of, and then finishing edging the rock garden.  
 The metal mesh hand is what I am going to install in the space next to my rock garden.  I want it to look like it is emerging from the ground.  It will not be mosaic-ed as I want it to be just concrete.  I plan to make something to set in or on the hand.  That will be figured out soon.

 The space here is cleared of sod, weeded and loosened a bit for the next step, which will be digging the hole for the wrist.
 Here is my first guess at the proper size of the dug space under the hand.  I needed to go a little farther, it seemed too small.  Don't want to have lawn mower issues, after all!
Ah yes, this is better!  We are also going to fill in the space to the right of the hand with large rocks, as a finale to that end of the stone fence.  The bird bath will be moved.
 I laid the hand down to estimate the size of the hole needed for the wrist.  That gave me a place to start with the size of the wrist.  Next step is to get out the metal working tools and the gloves!
The "completed" hole.

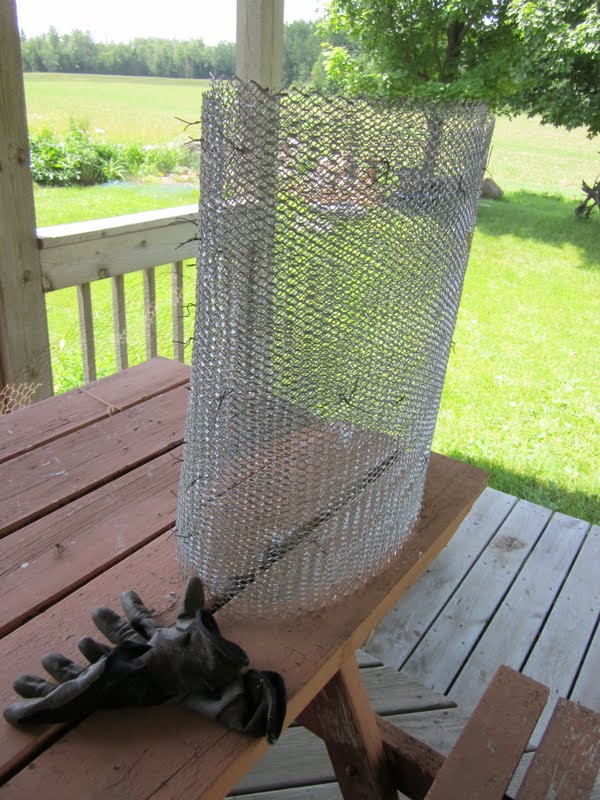
 Here is the mesh that I use for the form of the sculptures.  This wrist is going to be pretty simple and straight forward.  It is going to be rounded at the bottom and more oval at the top to accommodate the shape of the hand.  It has to have a double layer of mesh, so the concrete will stay on the metal, and will have some vertical reinforcement inside.  That will hopefully support the weight of the hand once it is concreted.  I am still considering whether to use rerod or pvc pipe to help the wrist stay rigid.


My favorite metal snips and I!

 I am beginning to form the metal into the wrist shape.  I decided that this piece of metal was a bit too tall, so I cut 6 inches off one side.  I had to tweak the shape of the hole and the wrist.  It will be sunk into the ground about 18 inches or so.

 After the initial form is bent into shape, it is time to get out the wire and pliers to twist into the metal to hold it in place.  They are like little twist ties.  The nitrile gloves I have on are imperative for my safety.  I have landed in urgent care from an injury during this process, so I don't take chance and always wear these babies.  I know they have saved me a quart or two of blood!  :)
 The wrist in progress.  If you look closely you can kind see the stitches that hold it together.  After this picture was taken I added some strips of mesh in the inside to add stability and rigidity.
At this point I went into the house for lunch and ran to do some errands, by the time I got home, there were thunderstorms forming!  I hope to do more on this tonight.

Next steps include putting the wrist into the ground, mixing up a batch of concrete to secure the wrist into the ground and then attaching the hand to the wrist.  I hope to make up that batch of concrete tomorrow!

Good progress is a joy!